
Apple introduced screenshot shortcuts to macOS more than a decade ago, and they remain one of the most useful built-in features for everyday users. Whether you’re capturing a full desktop or just a single window, the process is quick and intuitive.
If you’re learning how to snip on mac, the journey starts with native tools but extends to advanced apps that make editing, annotating, and sharing even smoother. This guide walks through the essentials and explores how professionals elevate their workflow with specialized software.
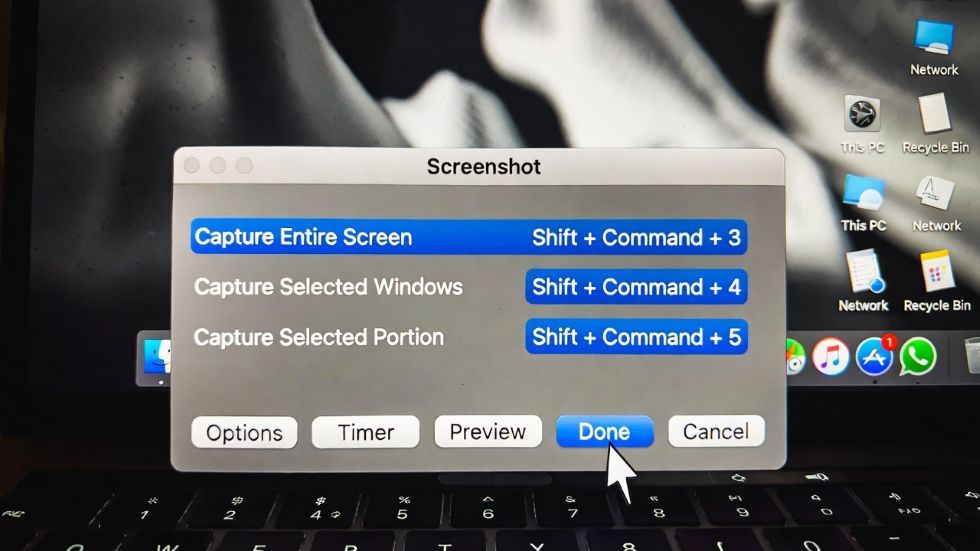
Mastering the Built-In Shortcuts
macOS provides several keyboard shortcuts that cover most screenshot needs:
- Command + Shift + 3: Capture the entire screen instantly.
- Command + Shift + 4: Select a portion of the screen with a drag tool.
- Command + Shift + 4, then Space: Snap a specific window or menu.
- Command + Shift + 5: Open the Screenshot toolbar for advanced options, including screen recording.
These shortcuts are simple but powerful. They allow beginners to grab images quickly without needing extra software.
Managing Where Screenshots Go
By default, screenshots appear on the desktop with a timestamped file name. While convenient, this can clutter your workspace. The Screenshot toolbar lets you change the save location, whether that’s a dedicated folder, the clipboard, or even directly into apps like Mail. Organizing your captures from the start saves time later when searching for files.
Editing with Preview
Preview, the default macOS image viewer, doubles as a lightweight editor. You can crop, resize, and annotate screenshots with text, arrows, and highlights. For quick adjustments, it’s more than enough. Many users rely on Preview for marking up documents or adding notes before sharing images with colleagues.
Going Beyond the Basics
For those who need more than the built-in tools, third-party apps expand the possibilities. Snagit, CleanShot X, and Skitch are popular choices. They offer scrolling captures, GIF creation, and instant cloud sharing. Some even include OCR technology, which extracts text from screenshots for easy editing. These features are invaluable for professionals creating tutorials, presentations, or technical documentation. And if you’re considering hardware upgrades to support heavier workflows, this guide to laptops for Sims 4 enthusiasts also provides useful insights into choosing processors that handle demanding tasks smoothly.
Best Practices for Screenshot Management
Good screenshot habits make a big difference. Consider these tips:
- Create a dedicated “Screenshots” folder to avoid clutter.
- Rename files with descriptive titles for easier searching.
- Use cloud storage like iCloud or Dropbox for access across devices.
- Regularly delete old captures to keep your system clean.
These practices ensure your screenshots remain useful rather than overwhelming.
Collaboration Made Easier
Screenshots are a staple in team communication. Whether pointing out a bug, sharing a design tweak, or giving feedback, a clear image often communicates faster than text. Apps like Slack and Microsoft Teams integrate seamlessly with macOS screenshots, allowing drag-and-drop sharing. Adding annotations makes your point even clearer.
Recording Your Screen
Sometimes a static image isn’t enough. macOS lets you record video of your screen using the Screenshot toolbar. You can capture the entire display or just a portion, with options to include audio. This is perfect for walkthroughs, tutorials, or troubleshooting sessions. Pairing recordings with voiceover commentary makes them even more effective.
From Beginner to Advanced
Learning how to snip on Mac is about matching tools to tasks. Beginners can rely on shortcuts, while advanced users benefit from apps that add editing, sharing, and automation. The key is flexibility. With practice, you’ll move from quick grabs to polished captures that enhance your workflow.
Conclusion
Screenshots are more than just images. They’re a vital part of communication, documentation, and collaboration. macOS makes the basics easy, and third-party apps unlock advanced features for professionals. By organizing your captures and exploring new tools, you’ll master how to snip on Mac and keep your workflow efficient and creative.